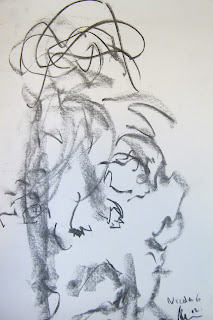
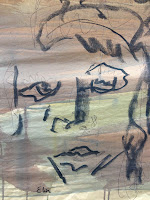
Because the paper was facing away from me I found that I got confused as to which way I was drawing, so some of the features I drew were upside down.
I changed each image slightly by changing between different materials. Charcoal/Inks/Biro/Pencil etc.
I really love these drawings! and like how they look once placed together.
Task 3
Lean back-to-back and mark the paper according to what you feel.
This was quite different to the other tasks as you couldn't use your hands or eyes to see the subject of your drawings. I could feel Nicola's shoulder blades move as she was drawing and also her spine. These are the areas that stand out most in the drawings. I tried to emphasise this with darker marks. The more I could feel something the harder I pressed, suggesting pressure on my back.
I really didn't like this task, I felt my personal space was being invaded. I also didn't like to intrude on Nicola's space: because of this I could only draw the bottom of the jaw before I had to stop from feeling uncomfortable.
It was very interesting because I really didn't think I would mind as much as I did.
It was good to watch other reactions in the room as people where completing the task.
I wont be doing this again any time soon!
This was a really interesting way of communicating through mark-making and observing how the other's mind worked around something you had just created.
Join with another pair and do the same as before but within a group of four.
This was much harder than before, there were more people in the group so you had to wait longer to make your mark. This soon became frustrating, I wanted to make new marks before anyone else could respond: but, because I had to 'wait my turn' new marks were already made leading me to change my response.
Inscription Brief
These sessions involve you in the activities of drawing - drawing as a mode of thinking, as an exploration of sensation and as a physical engagement with he surface and material. Through the activity of drawing we will begin to examine the ways in which we determine our environment by inscribing the surfaces that constitute it. Some work will focus on observational skills, some on a physical awareness of the action of drawing and the materials involved in their production. In these introductory sessions we will explore how how drawing can shape and articulate all other forms of practice, while also being an independent mode of practice.
Taking the experiences gained in the drawing exercises as a starting point. Develop a piece of work or a series of works that explore how inscribing, drawing, mark-making, tracing:
. can be used to determine or interrogate a particular physical environment
. can be used to determine or interrogate our body or self in relation to a particular physical environment
. can be used to generate meaning in relation to out sensory experiences of a particular physical environment
. take your own lines for a walk.
Wednesday 21st November 2012
I really liked the workshop tasks and wanted to develop them further so I started by creating a base/background for my work.
I plan on making two final pieces by the end of the two weeks: one involving the face and the other with buildings I saw from the Liverpool study trip.
Background One
I used five pieces of white A3 bread and butter paper, taped them together and then to the wall.
I placed masking tape over the top to manipulate the surface of the paper and make it more interesting to work on.
I find white paper quite daunting to start on as it is so bright and clean. I tend to use brown paper sketch books, coloured papers or I will make my own backgrounds before starting work: this way I don't feel like I will be making the first mark. I find it much easier to start a piece of work if it is already coloured/marked.
I wanted the paper to be dark in colour so I applied a brown and black ink wash.
B
ackground Two
For this I used a long piece of crumpled up brown packaging paper. Again, I used inks to change the colour slightly.
I will wait for this to dry and then do my drawings tomorrow.
Thursday 22nd November 2012
I decided to start with self portraits, I closed my eyes, touched my own face and drew what I felt.
I am pleased with how it turned out but if I were to do it again I would make a lot more and put them all together, I feel this will make a much bigger impact.
I am happy with how the charcoal looks and changes as it goes over the masking tape, I think this adds another element/layer to the work.
(Individually A3, Charcoal/white chalk)
I like how the faces turned out so instead of going with my initial idea of drawing building from Liverpool I chose to do a class/group portrait . I asked each person to come up one by one so I could draw them. Again, I was not looking at what I was drawing, I just looked at their face.
(Individually A4, Charcoal/black Biro)
I thought the white chalk stood out a little too much in the other piece so I stuck with just black drawing equipment. The Biro also allowed me to add more detail as it is much thinner.
I found it easier to draw the guys as they seemed to have more distinctive features like beards and glasses, because of this it was easier to tell who was who.
I haven't decided if I like this yet. It would be nice to see how the layout changes the look of the piece so if I did this again I would maybe lay them out differently: instead of a line I would place them into a rectangle or individual frames etc.


Friday 23rd November 2012
When drawing people from my group it felt very awkward! I ended up drawing quite quickly to get it over and done with, so I lost a lot of detail. I decided to go back to self portraits and thought it would be a good idea to play around with scale.
I used the same techniques as before (not looking and touching my face) but used an A1 piece of brown paper.
I was really happy with the facial features especially the noes and mouth, but the shape of the face and hair seemed to ruin it for me as it was too structured. I found it much easier to draw the features in the 'correct' place on a larger scale.
I used charcoal and once I was done I used the white chalk again to place highlights on the face, whilst looking, to give it a little depth.
I would like to work like this again but use different compositions.


Three Piece Together...
Week 2
Wednesday 28th November 2012
To change the composition, I turned the paper around so I was working in landscape. It works much better this way because I not only fill up more space but the general composition of what I was drawing was easier to achieve.
(A1,Charcoal/Biro/Brown Paper)
Thursday 29th November 2012
I kept the composition for this piece but felt like it needed something else. Instead of using ink as a back ground colour I used it as part of the image. For this I used my hands to apply the ink in places that would be in shadow.
Once dry, I used charcoal to add in larger details like the nose, lips, eyes and darker shadow.
Finally, I added in the smaller details like eyelashes, hair and detailing on the lips and nose, with a black Biro.
I am much happier with this final piece and looking back over the rest of my work you can see a real progress being made. I like how the ink gives the image another layer and more depth. Also, this was the first piece I made that didn't use charcoal over the whole image. I like how this has turned out and if I were to carry on with this idea, I would maybe play around with this a little more. I would use different materials to suggest the different features of the face, only using charcoal for certain parts. My ideas changed dramatically, I anticipated on only making two piece but ended up with five. The more my ideas and skills developed the more I was happy with the outcomes, I hope to use these techniques in future projects.


